Light Rendering Techniques
Diving into different techniques to render a large number of lights efficiently
Introduction
Light rendering has historically been known to heavily impact game performance. Ever since then, people have come up with improvements to pre-existing techniques as well as new techniques altogether for rendering a large number of dynamic lights. In this article I want to present and delve into these alternative techniques, as well as talk a bit about why someone might choose one over another.
Disclaimer: The rendering API used in this article is DirectX 12, using Microsoft’s MiniEngine. I will be as API-agnostic as I can be when talking about these techniques, but code snippets of the pipeline setup will still show API calls. The shading model used will be a PBR model based on Filament.
Forward rendering
The most common technique as well as the simplest, traditional forward rendering has been used as a default approach for most 3D renderers for a couple of decades now.
Breakdown
The way this technique’s pipeline is structured is very simple: as soon as a mesh is drawn, it’s also shaded. It’s a very straightforward approach, usable for many scenarios. There’s a reason it’s been the default technique used for so long.
Implementation
As mentioned before, this is pretty straightforward: in the context, we set the root signature and pipeline state, clear the color and depth buffer, do a few more necessary API calls and then draw the objects.
1
2
3
4
5
6
7
8
9
10
11
12
gfxContext.SetRootSignature(forwardRootSignature);
gfxContext.SetPipelineState(forwardShadingPSO);
gfxContext.TransitionResource(g_SceneColorBuffer, D3D12_RESOURCE_STATE_RENDER_TARGET, true);
gfxContext.TransitionResource(g_SceneDepthBuffer, D3D12_RESOURCE_STATE_DEPTH_WRITE, true);
gfxContext.ClearColor(g_SceneColorBuffer);
gfxContext.ClearDepth(g_SceneDepthBuffer);
gfxContext.SetRenderTarget(g_SceneColorBuffer.GetRTV(), g_SceneDepthBuffer.GetDSV());
gfxContext.SetViewportAndScissor(0, 0, g_SceneColorBuffer.GetWidth(), g_SceneColorBuffer.GetHeight());
gfxContext.SetPrimitiveTopology(D3D_PRIMITIVE_TOPOLOGY_TRIANGLELIST);
gfxContext.SetDynamicDescriptor(3, 0, lightBuffer.GetSRV());

DrawObjects(gfxContext);
As for the shaders, there’s only two: a vertex and a pixel shader. These are nothing special. The vertex shader takes in the mesh data, does a few calculations using it, and then sends data to the pixel shader that it can use to shade the mesh.
Deferred rendering
This technique was introduced as a way to overcome Forward rendering’s drawbacks, especially when it comes to more complex scenes. The deferred pipeline is vastly different and more complicated than traditional Forward rendering, which can be a bit daunting at first, but is actually relatively simple.
Breakdown
The pipeline consists of two passes: the geometry pass and the lighting pass. Essentially, the idea behind deferred rendering comes from the name: we defer the actual shading of the pixels to a later stage.
The geometry pass takes in all the mesh data and, in its pixel shader, writes it into something called the G-Buffer, which is short for Geometry Buffer. Simply put, the G-Buffer is just a collection of textures, each containing different data required for the lighting calculations of the mesh. The geometry pass goes over all of the meshes in the scene, drawing into the G-Buffer textures. At the end of the geometry pass, we will have our textures full of the final geometry data of our scene.
The image below shows an example of the geometry pass output, specifically the albedo textures. We are now ready for the next step.
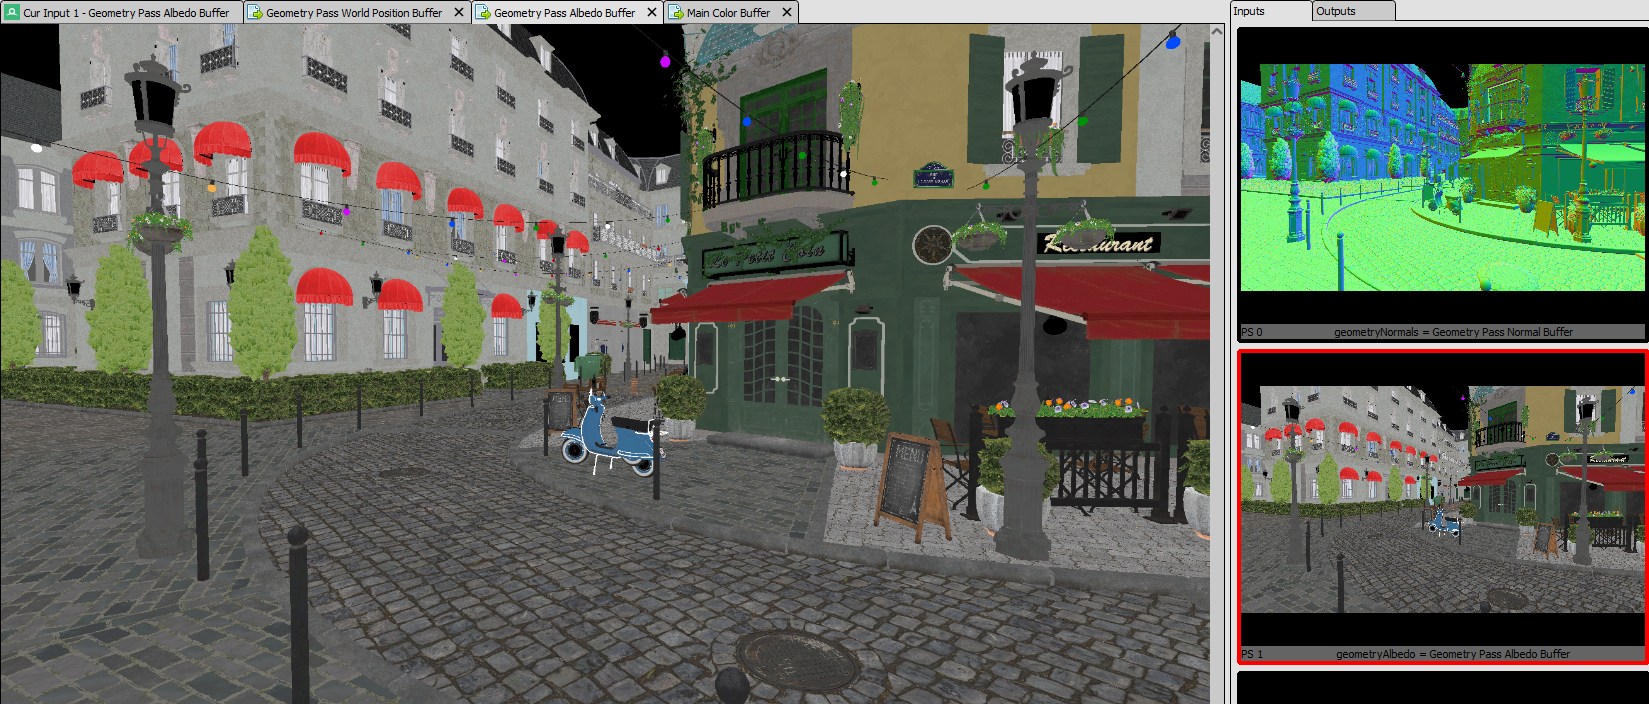
The lighting pass reads from the textures we drew into in the geometry pass and uses them to perform lighting calculations, which are done the same way you’d do them in Forward rendering. As such, the image above is not only the output of the geometry pass, but also the input of the lighting pass. At the end of the lighting pass, we have our final image.
Implementation
In my implementation, the structure and layout of my G-Buffer was chosen for its simplicity and ease of use, rather than out of a necessity to squeeze out performance. The textures that encompass my G-Buffer are: the geometry normals, albedo texture, emissive texture, metallic roughness texture, and the world position of the pixels.
First, let’s set up the geometry pass:
1
2
3
4
5
6
7
8
9
10
11
12
13
14
15
16
17
18
19
gfxContext.SetRootSignature(geometryPassRootSignature);
gfxContext.SetPipelineState(geometryPassPSO);
gfxContext.TransitionResource(geometryPassNormalBuffer, D3D12_RESOURCE_STATE_RENDER_TARGET, true);
gfxContext.TransitionResource(geometryPassAlbedoBuffer, D3D12_RESOURCE_STATE_RENDER_TARGET, true);
gfxContext.TransitionResource(geometryPassWorldPositionBuffer, D3D12_RESOURCE_STATE_RENDER_TARGET, true);
gfxContext.TransitionResource(geometryPassEmissiveBuffer, D3D12_RESOURCE_STATE_RENDER_TARGET, true);
gfxContext.TransitionResource(geometryPassMetallicRoughnessBuffer, D3D12_RESOURCE_STATE_RENDER_TARGET, true);
gfxContext.TransitionResource(g_SceneDepthBuffer, D3D12_RESOURCE_STATE_DEPTH_WRITE, true);
gfxContext.ClearColor(geometryPassNormalBuffer);
gfxContext.ClearColor(geometryPassAlbedoBuffer);
gfxContext.ClearColor(geometryPassWorldPositionBuffer);
gfxContext.ClearColor(geometryPassEmissiveBuffer);
gfxContext.ClearColor(geometryPassMetallicRoughnessBuffer);
gfxContext.ClearDepth(g_SceneDepthBuffer);
gfxContext.SetRenderTargets(_countof(gBufferRenderTargets), gBufferRenderTargets, g_SceneDepthBuffer.GetDSV());
gfxContext.SetViewportAndScissor(0, 0, g_SceneColorBuffer.GetWidth(), g_SceneColorBuffer.GetHeight());
gfxContext.SetPrimitiveTopology(D3D_PRIMITIVE_TOPOLOGY_TRIANGLELIST);

DrawObjects(gfxContext);
While this may seem like an overwhelming number of API calls, they do practically the same thing as the ones in the implementation of forward rendering, just on a larger scale. Instead of clearing one color buffer, we clear as many as we have G-Buffer textures. Then, we just draw the objects.
This is an example of how you’d write into one of the G-Buffer textures inside of the pixel shader:
1
2
3
4
5
6
7
8
9
10
11
12
13
14
15
16
17
18
19
20
21
struct GeometryBuffer
{
    float4 normals : SV_Target0;
    float3 albedo : SV_Target1;
    float3 worldPosition : SV_Target2;
    float3 emissive : SV_Target3;
    float2 metallicRoughness : SV_Target4;
};

GeometryBuffer main(PixelShaderInput input)
{
  GeometryBuffer gBuffer;

    float3 baseTexture = baseTexture.Sample(mainSampler, input.uv);

    gBuffer.albedo = baseTexture.xyz * baseColorFactor;

    ...

    return gBuffer;
}
By the end of this pass, our textures are already full with all the information we need to move onto the next step.
The lighting pass is very simple:
1
2
3
4
5
6
7
8
9
10
11
12
13
14
15
16
17
18
19
20
gfxContext.TransitionResource(geometryPassAlbedoBuffer, D3D12_RESOURCE_STATE_PIXEL_SHADER_RESOURCE);
gfxContext.TransitionResource(geometryPassNormalBuffer, D3D12_RESOURCE_STATE_PIXEL_SHADER_RESOURCE);
gfxContext.TransitionResource(geometryPassWorldPositionBuffer, D3D12_RESOURCE_STATE_PIXEL_SHADER_RESOURCE);
gfxContext.TransitionResource(geometryPassEmissiveBuffer, D3D12_RESOURCE_STATE_PIXEL_SHADER_RESOURCE);
gfxContext.TransitionResource(geometryPassMetallicRoughnessBuffer, D3D12_RESOURCE_STATE_PIXEL_SHADER_RESOURCE);
gfxContext.TransitionResource(g_SceneColorBuffer, D3D12_RESOURCE_STATE_RENDER_TARGET);
gfxContext.ClearColor(g_SceneColorBuffer);
gfxContext.SetRootSignature(lightingPassRootSignature);
gfxContext.SetPipelineState(lightingPassPSO);
gfxContext.SetDynamicDescriptor(0, 0, geometryPassNormalBuffer.GetSRV());
gfxContext.SetDynamicDescriptor(1, 0, geometryPassAlbedoBuffer.GetSRV());
gfxContext.SetDynamicDescriptor(2, 0, geometryPassWorldPositionBuffer.GetSRV());
gfxContext.SetDynamicDescriptor(3, 0, geometryPassEmissiveBuffer.GetSRV());
gfxContext.SetDynamicDescriptor(4, 0, geometryPassMetallicRoughnessBuffer.GetSRV());
gfxContext.SetDynamicDescriptor(5, 0, lightBuffer.GetSRV());
gfxContext.SetConstantArray(6, sizeof(glm::vec3) / sizeof(uint32_t), &camera->position);
gfxContext.SetRenderTarget(g_SceneColorBuffer.GetRTV());
gfxContext.SetVertexBuffer(0, quadVertexBufferView);

gfxContext.Draw(6);
We transition the former render targets into pixel shader resources, clear the main color buffer and bind the G-Buffer textures to the shader, as well as any other data we may need. Then, we draw a screen-filling quad.
This is an example of how you’d use the data passed from the G-Buffer in the pixel shader:
1
2
3
4
5
6
7
8
9
10
11
12
13
14
15
16
...
Texture2D<float3> geometryAlbedo : register(t1);
...

float3 main(PixelShaderInput input) : SV_Target
{
    ...

    float3 albedo = geometryAlbedo.Sample(mainSampler, input.uv);

    ...

    // Lighting calculations

    ...
}
That pretty much covers it. As soon as this part of the pipeline is done, our work is done and the final image is presented.
Forward+
Forward+, also known as Tiled Forward Rendering, is a sort of extension to traditional Forward rendering. Introduced more recently than Forward and Deferred rendering, Forward+ was introduced as a way to keep the advantages of the simplicity of Forward rendering, but also have performance that is comparable to Deferred rendering, due to minimizing the amount of redundant light calculations that are done in the rendering of a frame.
Breakdown
While I did say the word “simplicity”, that comes at a later point. Until then, while the Forward+ pipeline is more straight forward than Deferred, it’s still a bit harder to wrap your head around its finer details than with standard Forward rendering. As such, I want to talk a bit about the general gist behind Forward+ before delving into its individual steps.
In traditional Forward rendering, for every pixel of the screen, we take into account the contribution of each light in the scene. This is fine if all of the lights in the scene are directional lights or very intense lights bright enough to cover the whole screen. The problem, however, is noticeable when we have lights with attenuation. At some point, the distance between a light and a pixel will be so great that its contribution to the pixel will be practically nonexistent. In traditional Forward rendering, we still perform all lighting calculations, even for those lights that don’t end up contributing anything. This is the problem for which Forward+ offers the answer. By splitting the screen into tiles, we separate it into smaller areas. If we can find a way to know exactly what lights will definitely affect that area of the screen, then we don’t have to go over the lights that won’t.

As can be seen in the image above 1, we can assume a volume for a point light with attenuation by declaring a cutoff point after which we do not take its contribution into account anymore. By using the distance to that point as a radius and the position of the point light as the center of a sphere, we can create a light volume. If we can find a way to check if that light volume intersects with one of our tiles, then we can add it to the list of lights that we know will affect some, if not all of the pixels within that tile. The blue dots in the top left corner of the tiles indicate that the tile intersects with the light volume.
Before I can begin explaining how we’re going to be doing all this, I want to give a short summary of what Forward+ does, on a basic level. It splits the screens into tiles, checks which lights affect which tiles, and then, when finally shading the pixels, only performs the lighting calculations for the lights it knows will affect the tile they belong to. Now let’s get to a few more details:
The pipeline consists of three steps, these being the depth prepass, light culling and final shading, which we will go over one at a time:
The depth prepass is a prerequisite for light culling. As we will understand later, light culling needs the data from the depth buffer in order to optimize the technique. This pass just writes into the depth buffer, so it’s nothing fancy.
Light culling is the step in which we actually create the list of which lights affect which tile, also known as the light index list. This step is done in a compute shader, where we dispatch as many thread groups as there are tiles, consisting of as many threads as the size of a tile. These threads go over all of the lights in the scene, and if one intersects with the tile, it gets added to that tile’s light index list. The final result of the light culling step is a global light index list containing the indices of the lights that affect each tile.
Final shading is pretty much the same as the shading part of traditional Forward rendering, except that the lights we go over are only the ones corresponding to that pixel’s tile, information which we get through the global light index list.
Implementation
The phrasing I used before, specifically when I talked about a light “intersecting the tile” is actually inaccurate. What we actually check with is not the tile, but its frustum. Just like frustum culling can be done to check what meshes are within the view frustum of the camera, so can it be done to check if a light volume is within the frustum of a tile.
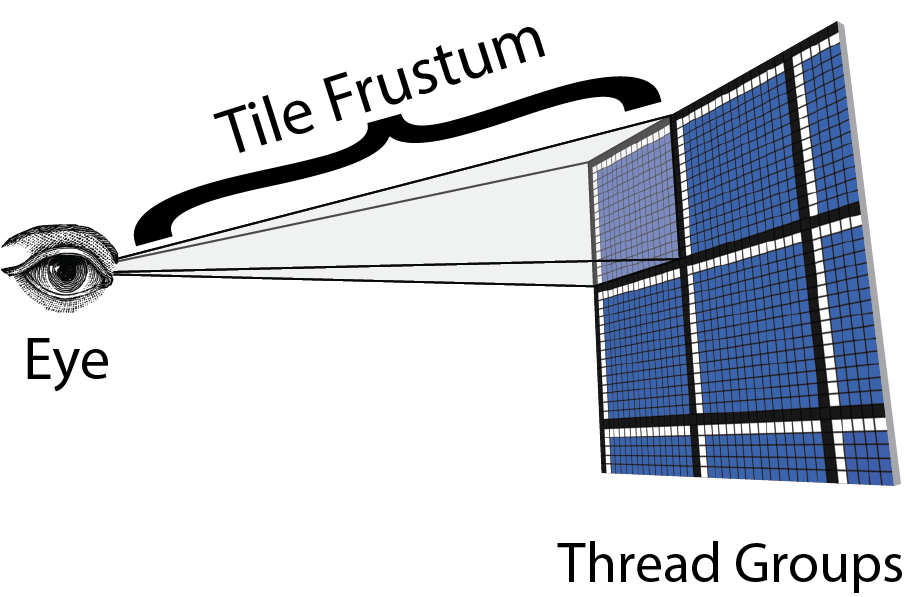
The image above 2 helps visualize this. We need a frustum from the eye to the view space position of the tile. The first step is to calculate these. You can find details regarding the calculation of those frustums here.
Now that we have the tile frustums, we can begin working on the pipeline itself.
For the depth prepass, we need to draw the geometry in the scene and then write its depth into the depth buffer.
1
2
3
4
5
6
7
8
9
10
11
12
13
14
15
16
17
18
19
20
21
22
GraphicsContext& context = GraphicsContext::Begin(L"Depth prepass");

context.TransitionResource(g_SceneDepthBuffer, D3D12_RESOURCE_STATE_DEPTH_WRITE);
context.ClearDepth(g_SceneDepthBuffer);
context.SetPrimitiveTopology(D3D_PRIMITIVE_TOPOLOGY_TRIANGLELIST);
context.SetRootSignature(depthPrepassRootSignature);
context.SetPipelineState(depthPrepassPSO);
context.SetDepthStencilTarget(g_SceneDepthBuffer.GetDSV());
context.SetViewportAndScissor(0, 0, g_SceneColorBuffer.GetWidth(), g_SceneColorBuffer.GetHeight());

...

for (int i = 0; i < sceneModel->meshes.size(); i++)
{
	context.SetConstantArray(0, sizeof(glm::mat4) / sizeof(uint32_t), &sceneModel->GetMVP(context, currentTransform, projection, camera, i));
	context.SetVertexBuffer(0, sceneModel->meshes[i]->getMesh()->getVertexBufferView());
	context.SetIndexBuffer(sceneModel->meshes[i]->getMesh()->getIndexBufferView());
	context.DrawIndexed(sceneModel->meshes[i]->getMesh()->getNrIndices());
}

context.TransitionResource(g_SceneDepthBuffer, D3D12_RESOURCE_STATE_NON_PIXEL_SHADER_RESOURCE);
context.Finish();
The code above makes sure we can write into the depth buffer, clears it, makes some necessary API calls and then draws all the meshes. All that happens in the vertex shader is that the vertex position gets multiplied with the MVP matrix, and the pixel shader just writes into the depth buffer.
1
2
3
4
5
6
7
8
9
10
11
12
13
14
15
16
struct PixelShaderInput
{
    float4 position : SV_Position;
};

struct PixelShaderOutput
{
    float depth : SV_Depth;
};

PixelShaderOutput main(PixelShaderInput input)
{
    PixelShaderOutput output;
    output.depth = input.position.z;
    return output;
}
Now that the depth prepass is complete, we have everything we need to move onto light culling.
1
2
3
4
5
6
7
8
9
10
11
12
13
14
15
16
ComputeContext& compContext = ComputeContext::Begin(L"Light Culling");

compContext.TransitionResource(g_SceneDepthBuffer, D3D12_RESOURCE_STATE_PIXEL_SHADER_RESOURCE);
compContext.SetRootSignature(lightCullingRootSignature);
compContext.SetPipelineState(lightCullingPSO);
compContext.SetConstantArray(0, sizeof(ComputeParams) / sizeof(uint32_t), computeFrustumsParameters);
compContext.SetDynamicDescriptor(1, 0, structuredComputeFrustumsBuffer.GetSRV());
compContext.SetDynamicDescriptor(2, 0, lightBuffer.GetSRV());
compContext.SetDynamicDescriptor(3, 0, g_SceneDepthBuffer.GetDepthSRV());
compContext.SetDynamicDescriptor(4, 0, structuredLightIndexCounterBuffer.GetUAV());
compContext.SetDynamicDescriptor(5, 0, structuredLightIndexListBuffer.GetUAV());
compContext.SetDynamicDescriptor(6, 0, lightGridBuffer.GetUAV());

compContext.Dispatch(nrThreadsX / tileSize, nrThreadsY / tileSize);

compContext.Finish();
The CPU side is very simple, it just binds the data structures2 to the shader and dispatches as many thread groups as there are tiles. The GPU side is where it gets more interesting. The reason we needed the depth prepass before this step is to determine the near and far planes of the frustums. The reason we do this is to minimize the size of the tile frustum. First, we use atomic min and max operations to determine the minimum and maximum depth of the tile. We then go over every pixel in the tile and we use the minimum tile depth as the near plane of the frustum and the maximum depth as the far plane. This way, lights that are before the first geometry in the tile and after the last geometry of the tile are not taken into account, as they won’t affect any of the pixels inside of it.
1
2
3
4
5
6
7
8
9
10
11
12
13
14
15
16
17
18
19
20
21
22
23
[numthreads(TILE_SIZE, TILE_SIZE, 1)]
void main(ComputeShaderInput input)
{
    ...

    for (uint i = input.groupIndex; i < nrLights; i += TILE_SIZE * TILE_SIZE)
    {
        if (!lights[i].isDirectional)
        {
            PointLight light = lights[i];

            Sphere lightSphere = { light.position, 150 };

            if (SphereInsideFrustum(lightSphere, GroupFrustum, nearClipViewSpace, maxDepthViewSpace) &&
                !SphereInsidePlane(lightSphere, minPlane))
            {
                AppendLight(i);
            }
        }
    }

    ...
}
Lastly, we have the final shading. Now that we’ve built the global light index list and we know what lights affect which tile, all we need to do in the final shading step is to determine what tile of the screen the pixels we’re shading are in, then, by indexing the global light index list, only calculating the lighting for the lights within it.
1
2
3
4
5
6
7
8
9
10
11
12
13
14
15
16
17
18
19
20
21
22
23
24
25
26
27
28
29
30
float4 main(PixelShaderInput input) : SV_Target
{
    float3 final_color = float3(0.0, 0.0, 0.0);

    ...

    uint2 tileIndex = uint2(floor(input.position.xy / TILE_SIZE));
    uint startOffset = lightGrid[tileIndex].x;
    uint lightCount = lightGrid[tileIndex].y;

    for (int i = 0; i < lightCount; i++)
    {
        uint lightIndex = lightIndexList[startOffset + i];

        if (lights[lightIndex].isDirectional == 0)
        {
          // Light calculations
            ...
        }
        else if (lights[lightIndex].isDirectional == 1)
        {
          // Light calculations
            ...
        }
    }

    ...

    return float4(final_color, 1.0);
}
With this, we’re done. I know I said the technique was simpler than deferred, but that simplicity doesn’t come in terms of difficulty of implementation, but rather how easy it is to work with the technique in the future.
And with this, we’re done. Here is what the final result looks like. The video above shows Amazon Lumberyard Bistro with 300 point lights. The first half is using traditional Forward shading and the second is using Forward+. The data is available at the top left of the screen.
Comparison
Now that we talked a bit about some light rendering techniques and had a look at how they work and how one might implement them, I want to talk about why you might choose one over another. As with all things, everything has its pros and cons:
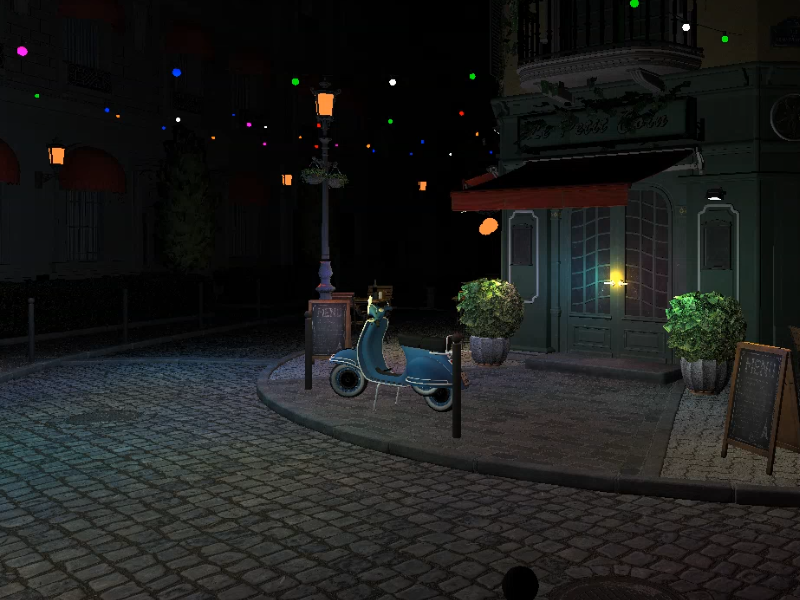
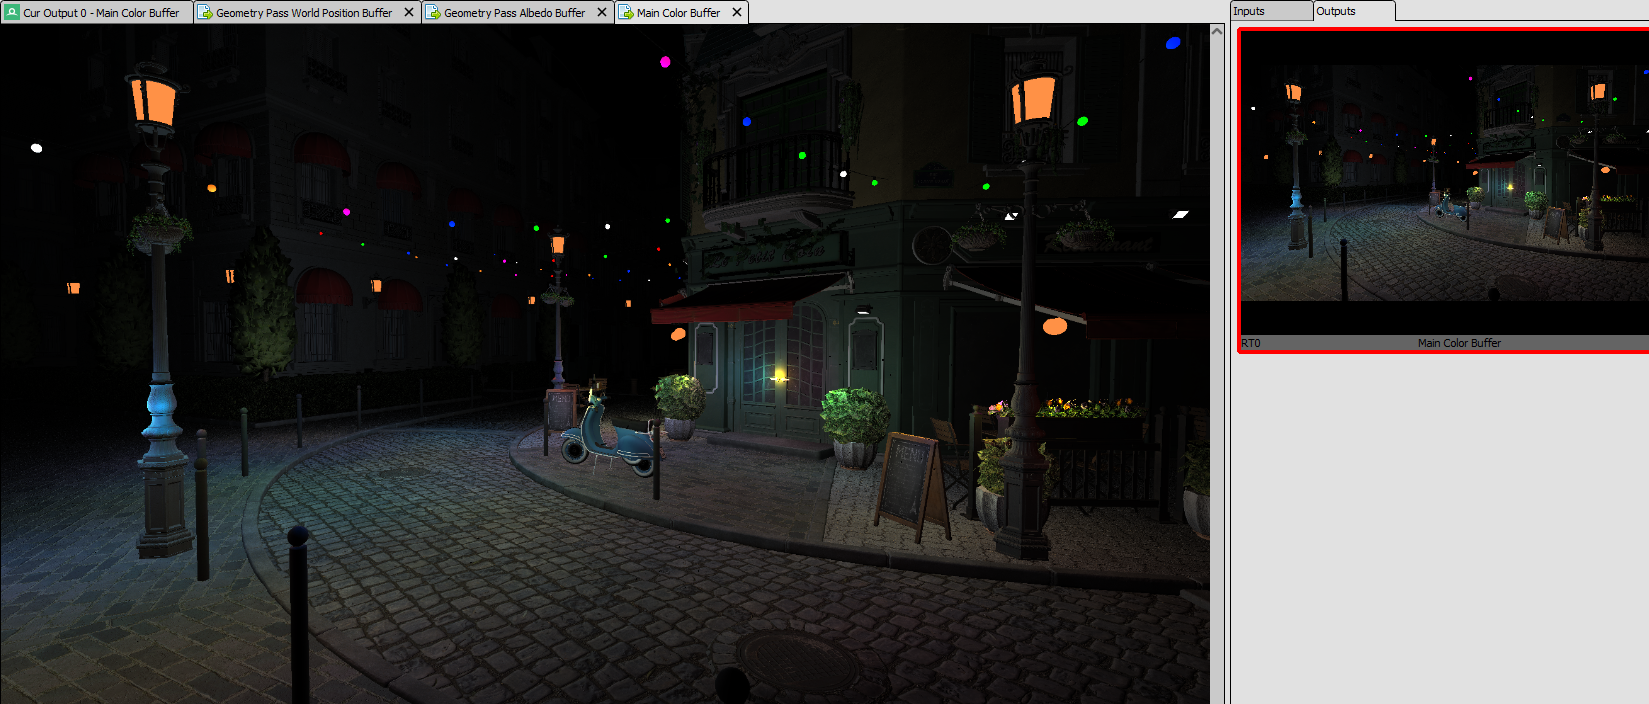
Forward rendering is suited for simple scenes, with few dynamic lights, as well as scenes which require semi-transparent objects and techniques such as MSAA, or multiple shading models. Since forward shading also has a lower memory footprint, it’s also a valid choice if GPU memory is scarce. The problem is that it is by far the slowest of the other two options we discussed. A big problem with forward rendering is overdraw, which is due to the fact that we shade everything the moment we draw it. As you can see in the first image, we drew and shaded these cubic stones, but two draw calls later, they’re covered up by the manhole cover, as can be seen in the second picture. This means that all the calculations we performed in order to shade the stones in the first image were a complete waste of time.
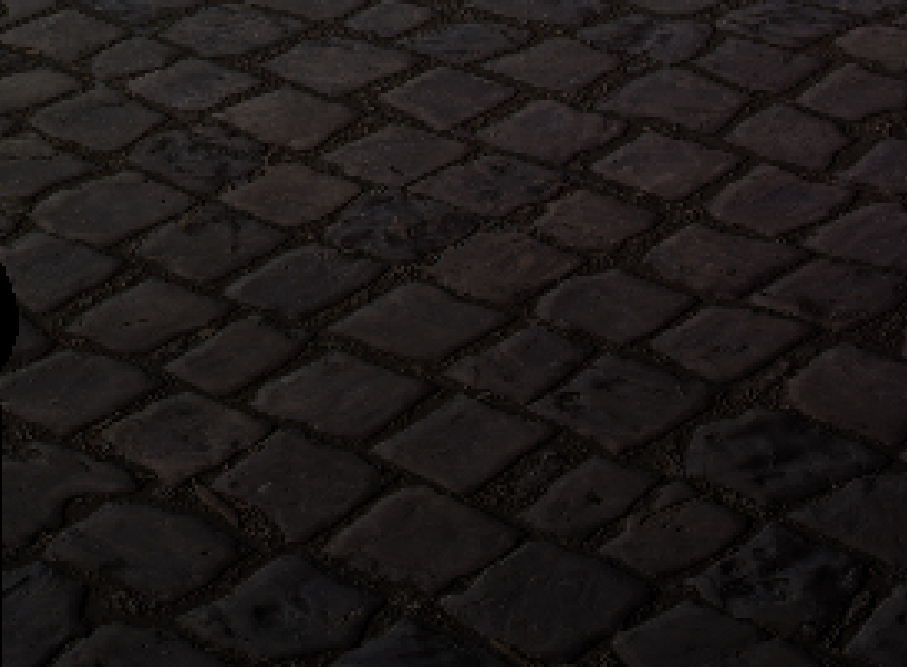
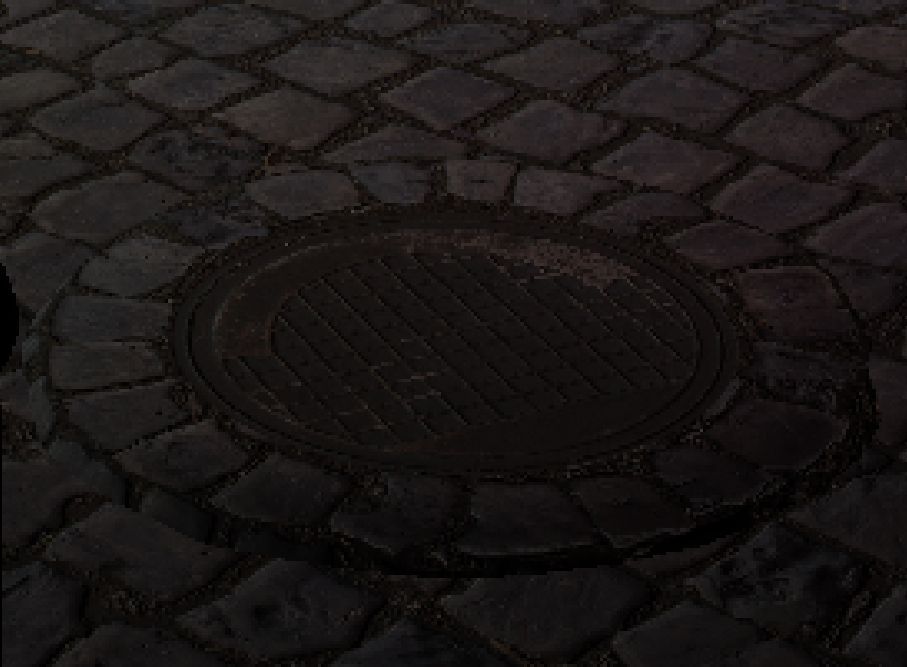
Avoiding wasteful computations like these is part of the reason the other two techniques usually outshine this one in terms of performance.
Deferred rendering is great for more complicated scenes that have a lot of lights, as well as complex meshes where overdraw might commonly occur in an otherwise forward pipeline, which it completely prevents, as the textures that are passed to it from the geometry pass are exactly the pixels that are going to be visible on the screen after final shading. The drawbacks of deferred are that it has high memory and bandwidth requirements, as the storing, writing and reading of the textures of which geometry buffers consist is expensive. Reading memory is always slow, and it causes latency. While waiting for the memory to be read, the GPU can still perform other tasks, but at some point the GPU can’t do anything but stall and wait until the memory is read 1 3.
Forward+ has a more complicated pipeline than traditional Forward rendering, but allows for the same amount of flexibility in terms of transparency, hardware anti-aliasing and different shading models. This is what I meant earlier when I said it maintains its simplicity. It has more overhead, initially, but quickly surpasses both traditional Forward and Deferred rendering. In situations where compute shaders are available, Forward+ is also a very good choice.
Conclusion
Choosing between these three techniques really depends on the needs of your project. Forward rendering works well for simpler scenes with few lights and when you need transparency or MSAA. Deferred rendering is really great at rendering a large number of lights and scenes with complex geometry that could cause a lot of overdraw, but it has issues when it comes to memory usage. Forward+ is a sort of balance, a middle ground, if you will, between the two. It maintains the aforementioned simplicity of Forward rendering while also being much more efficient at rendering a large number of lights. Ultimately, it’s up to you and your personal needs.